序言
有志者,事竟成。
今天来记录一次ASM插桩,接下来会主攻ASM框架了,“抽象中的抽象”。
目标 实现如下代码注释的目标,在固定代码的前后,以及 return 语句之前插入逻辑 ,这基本上就可以满足实际的需求了。
1
2
3
4
5
6
7
8
9
10
11
12
13
14
15
16
17
18
19
20
21
22
23
24
25
26
27
public class Music public void run () System.out.println("this is run" ); } public int getValue () System.out.println("this is getValue" ); return 1 ; } public void put (String value) } private void add (String value, Thread thread) } protected Music fake (int [] nums, String[] values) return null ; } }
依赖 maven:
1 2 3 4 5 <dependency > <groupId > org.ow2.asm</groupId > <artifactId > asm</artifactId > <version > 8.0.1</version > </dependency >
实现 分为3部分,首先我们直接上代码,待会儿再说理解:
第一部分 1 2 3 4 5 6 7 8 9 10 11 12 13 14 15 16 17 18 19 20 21 22 23 24 private static Music music;private static final String PATH = "待转换的类路径" ;public static void main (String[] args) throws IOException try { ClassReader cr = new ClassReader("FKtemp.Music" ); ClassWriter cw = new ClassWriter(ClassWriter.COMPUTE_MAXS); ClassVisitor cv = new MyVisitor(cw); cr.accept(cv,ClassReader.EXPAND_FRAMES); byte [] result = cw.toByteArray(); File file = new File(PATH+"damn.class" ); FileOutputStream fos = new FileOutputStream(file); fos.write(result); fos.close(); } catch (IOException e) { e.printStackTrace(); } }
理解:
待转换的类叫做Music,我先写一个ClassReader去读取这个类;
写一个ClassWriter,cw,去读取,参数COMPUTE_MAXS的意思是自动计算局部变量与操作数栈部分的大小;
ClassVisitor cv = new MyVisitor(cw);可以看到用了多态,这个MyVisitor是需要在后续完成的自定义组件;我们的cv也需要委托cw;cr.accept(cv,ClassReader.EXPAND_FRAMES);cr再委托给cv去做。
第二部分 这一部分就是我们自定义的ClassVisitor,叫做MyVisitor。直接上代码:
1 2 3 4 5 6 7 8 9 10 11 12 13 14 15 16 17 18 19 20 21 22 23 24 25 26 27 28 private static class MyVisitor extends ClassVisitor public MyVisitor (ClassVisitor cv) super (Opcodes.ASM5, cv); } @Override public MethodVisitor visitMethod (int access, String name, String descriptor, String signature, String[] exceptions) System.out.println("=====================" ); System.out.println("acce== " + access); System.out.println("name== " + name); System.out.println("desc== " + descriptor); System.out.println("sign== " + signature); System.out.println("=====================" ); MethodVisitor mv = super .visitMethod(access, name, descriptor, signature, exceptions); if (name.equals("run" )) { mv = new MyMethodVisitor(Opcodes.ASM5, mv); } if (name.equals("getValue" )) { mv = new MyMethodVisitorWithReturn(Opcodes.ASM5, mv); } return mv; } }
理解:
这里唯一重点就是重写了visitMethod方法。当我们的cv去访问class文件,只要遇到类方法,那么就会由visitMethod来响应。
在这个函数内部,我们首先来打印类方法的访问权限/名称/描述符/方法签名;
接下来,对于我们需要插桩的两个函数,run和getValue函数,分别进行响应,就有了第三部分;
第三部分 MyMethodVisitor部分;
1 2 3 4 5 6 7 8 9 10 11 12 13 14 15 16 17 18 19 20 21 22 23 24 25 26 27 28 29 30 31 32 33 34 35 36 37 38 39 40 41 private static class MyMethodVisitor extends MethodVisitor MyMethodVisitor(int api, MethodVisitor mv) { super (api, mv); } @Override public void visitCode () super .visitCode(); System.out.println("start hack before" ); hack(mv, "asm insert before" ); } @Override public void visitInsn (int opcode) if (opcode == Opcodes.RETURN) { System.out.println("start hack after" ); hack(mv, "asm insert after" ); } super .visitInsn(opcode); } private static void hack (MethodVisitor mv, String msg) mv.visitFieldInsn( Opcodes.GETSTATIC, Type.getInternalName(System.class ), "out", Type.getDescriptor(PrintStream.class ) ) ; mv.visitLdcInsn(msg); mv.visitMethodInsn( Opcodes.INVOKEVIRTUAL, Type.getInternalName(PrintStream.class ), "println", "(Ljava/lang/String;)V" , false ); } }
MyMethodVisitorWithReturn部分:
1
2
3
4
5
6
7
8
9
10
11
12
13
14
15
16
17
18
19
20
21
22
23
24
25
26
27
28
29
30
31
32
private static class MyMethodVisitorWithReturn extends MethodVisitor public MyMethodVisitorWithReturn (int api, MethodVisitor mv) super (api, mv); } @Override public void visitInsn (int opcode) System.out.println("opcode==" + opcode); if (opcode == Opcodes.IRETURN) { hack(mv, "insert before return" ); } super .visitInsn(opcode); } private static void hack (MethodVisitor mv, String msg) mv.visitFieldInsn( Opcodes.GETSTATIC, Type.getInternalName(System.class ), "out", Type.getDescriptor(PrintStream.class ) ) ; mv.visitLdcInsn(msg); mv.visitMethodInsn( Opcodes.INVOKEVIRTUAL, Type.getInternalName(PrintStream.class ), "println", "(Ljava/lang/String;)V" , false ); } }
理解:
先说第一个MyMethodVisitor部分,这个类也还是自定义的,重写了visitCode方法和visitInsn方法,分别进行插桩;
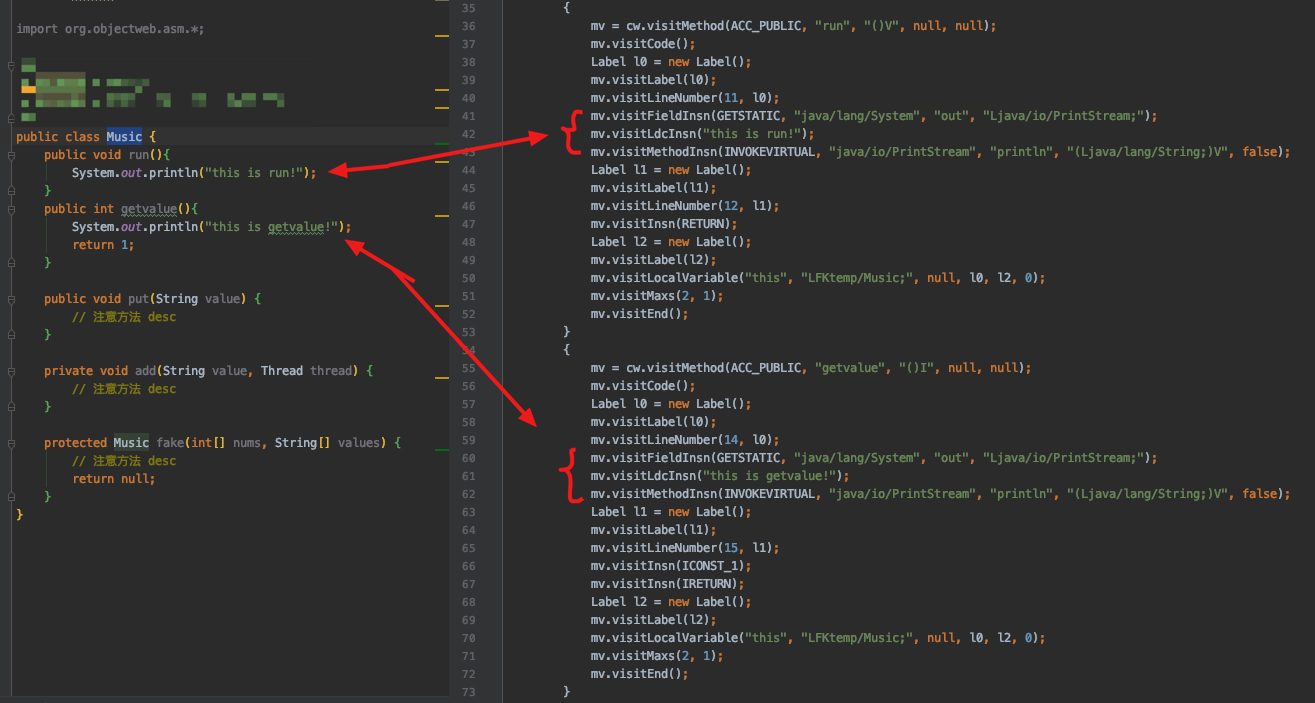
所谓插桩就是直接插入class内容,ASM已经封装好了,直接用插件看:
其实就是三行话,直接拿进来写。
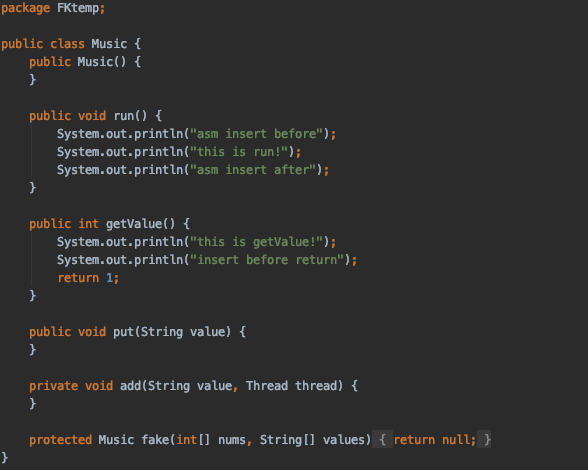
结果 运行代码,直接看生成的damn.class: