序言
锲而不舍,金石可镂。
今天来总结Java基础,来填本科的坑。
本篇会持续更新。
Java数据类型
基础类型:8种
int、float、double、float、double、char、byte、boolean
引用类型:5种
类 / 数组 / 接口 / 枚举 / 注解
区别:
基本类型的变量存储原始值(常量),常量存放在堆上。
引用类型的变量存储地址,存储的是堆中对象的地址。
从源代码到机器码,到底发生了什么?
参考陈树义
如下图所示,编译器可以分为:前端编译器、JIT 编译器和AOT编译器。
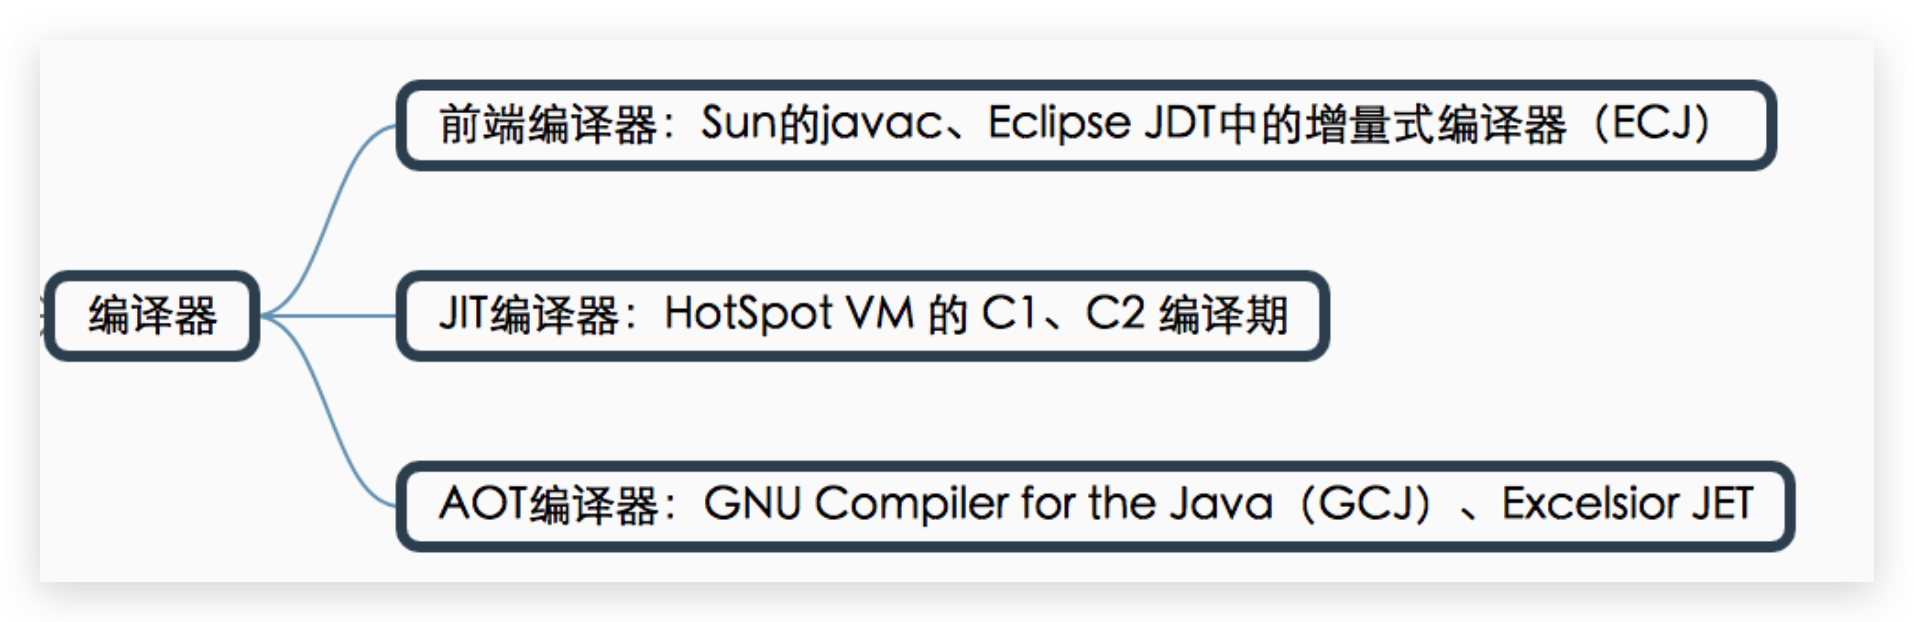
前端编译器 : 源代码->class字节码
javac
javac 编译器的处理过程可以分为下面四个阶段:
- 第一个阶段:词法、语法分析。在这个阶段,javac 编译器会对源代码的字符进行一次扫描,最终生成一个抽象语法树AST。简单地说,在这个阶段 javac 编译器会搞懂我们的代码到底想要干嘛。就像我们分析一个句子一样,我们会对句子划分主谓宾,弄清楚这个句子要表达的意思一样。
- 第二个阶段:填充符号表。我们知道类之间是会互相引用的,但在编译阶段,我们无法确定其具体的地址,所以我们会使用一个符号来替代。在这个阶段做的就是类似的事情,即对抽象的类或接口进行符号填充。等到类加载阶段,javac 编译器会将符号替换成具体的内存地址。
- 第三个阶段:注解处理。我们知道 Java 是支持注解的,在这个阶段会对注解进行分析,根据注解的作用将其还原成具体的指令集。
- 第四个阶段:字节码生成。到了这个阶段,javac 编译器便会根据上面几个阶段分析出来的结果,进行字节码的生成,最终输出为 class 文件。
JIT编译器:class字节码->机器码
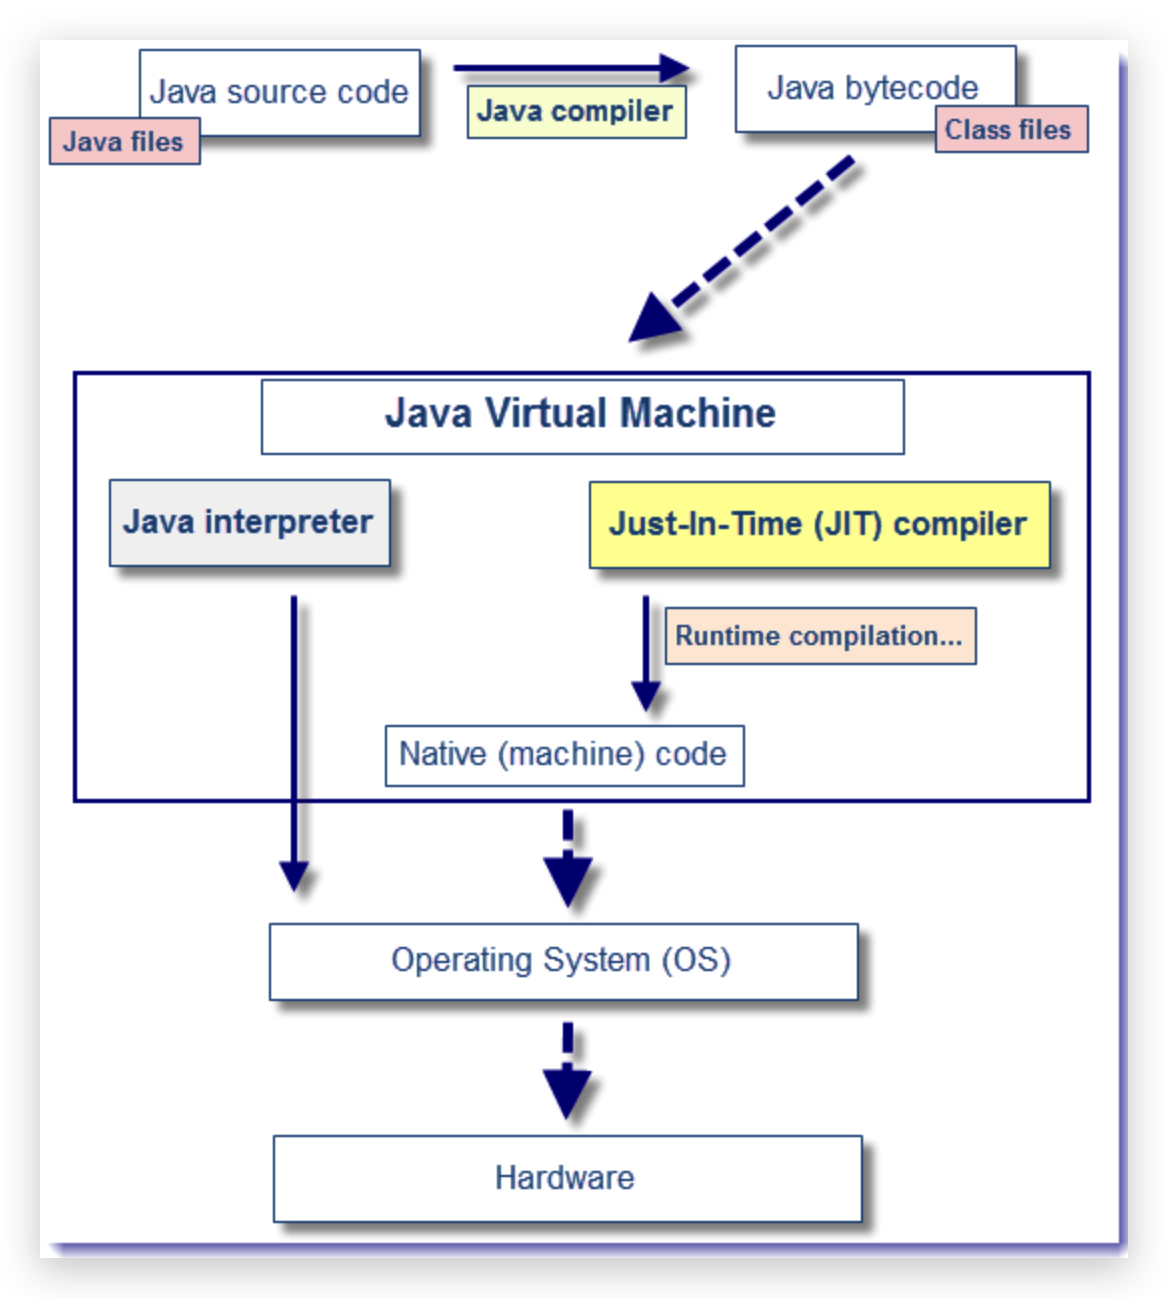
当源代码转化为字节码之后,其实要运行程序,有两种选择:
一种是使用 Java 解释器解释执行字节码,启动快,但是运行慢
另一种则是使用 JIT 编译器将字节码转化为本地机器代码,启动慢,但是运行快
原因很简单。
解释器不需要像 JIT 编译器一样,将所有字节码都转化为机器码,自然就少去了优化的时间。
当 JIT 编译器完成第一次编译后,其会将字节码对应的机器码保存下来,下次可以直接使用。
机器码的运行效率肯定是高于 Java 解释器的。
实际情况中,为了运行速度以及效率,我们通常采用两者相结合的方式进行 Java 代码的编译执行。
值传递与引用传递
发生在形参与实参传递的过程中。
值传递
基本类型的变量赋值就是值传递,相当于直接将常量值复制一份,函数接收的是原始值的一个copy。
此时内存中存在两个相等的基本类型,即实参和形参。
后面方法中的操作都是对形参这个值的修改,不影响实际参数的值。
引用传递
也称为地址传递。方法调用时,实际参数的引用被传递给方法中相对应的形式参数,函数接收的是原始值的内存地址。
在方法执行中,形参和实参内容相同,指向同一块内存地址,方法执行中对形参的操作将会影响到实际对象。
接口与抽象类的区别
一个类只能继承一个父类,但是可以实现多个接口
抽象类
只要类中有抽象方法,那么他就是抽象类
抽象方法:abstract+只有方法名 默认public abstract修饰
final 与 abstract不共存
抽象类可以有成员变量、构造方法、抽象方法
只支持单继承
继承抽象类的子类必须extends,实现抽象类中的全部抽象方法
接口
接口中方法默认 public abstract修饰
一个类如果实现了接口,那么就需要实现接口的全部方法
接口中方法默认public abstract
接口中字段默认public static final
在JDK8中可以定义static静态方法 & default方法 default修饰方法的有默认方法体,实现类可以不重写default方法
接口支持多继承
编译类型与运行类型
经典例子:
1 | Father child = new son(); |
理解:
编译类型由声明该变量的类型决定声明啥是啥,运行类型由实际赋值给的变量决定new啥是啥
如果这两个类型不一样,那么就是多态。
属性不具有多态,也就是对象在调用属性的时候,总会访问它编译类型的属性,而不是运行类型。
首先声明了一个引用类型Father child,用它来指向son类的一个实例。
在程序运行时,首先会调用父类的构造器,然后再调用子类的构造器。
在编译过程中,会自动检查引用变量Father child的编译类型,发现是Father类,会检查是否拥有doWork方法。
但是在JVM实际运行中,调用的是子类的doWork方法,而不是父类的,这就是运行时多态。
找方法,先找子类:
如果子类没有,再去找父类。
方法重写override 与重载overload
Override 重写 (子类对父类方法重写)
名称+参数列表必须完全相同
返回值类型 如果不同的话,必须是兼容类型
构造方法 final 和 static方法 不能重写
Overload 重载 (一个方法内)
方法名称必须相同,参数必须不同
返回值没要求
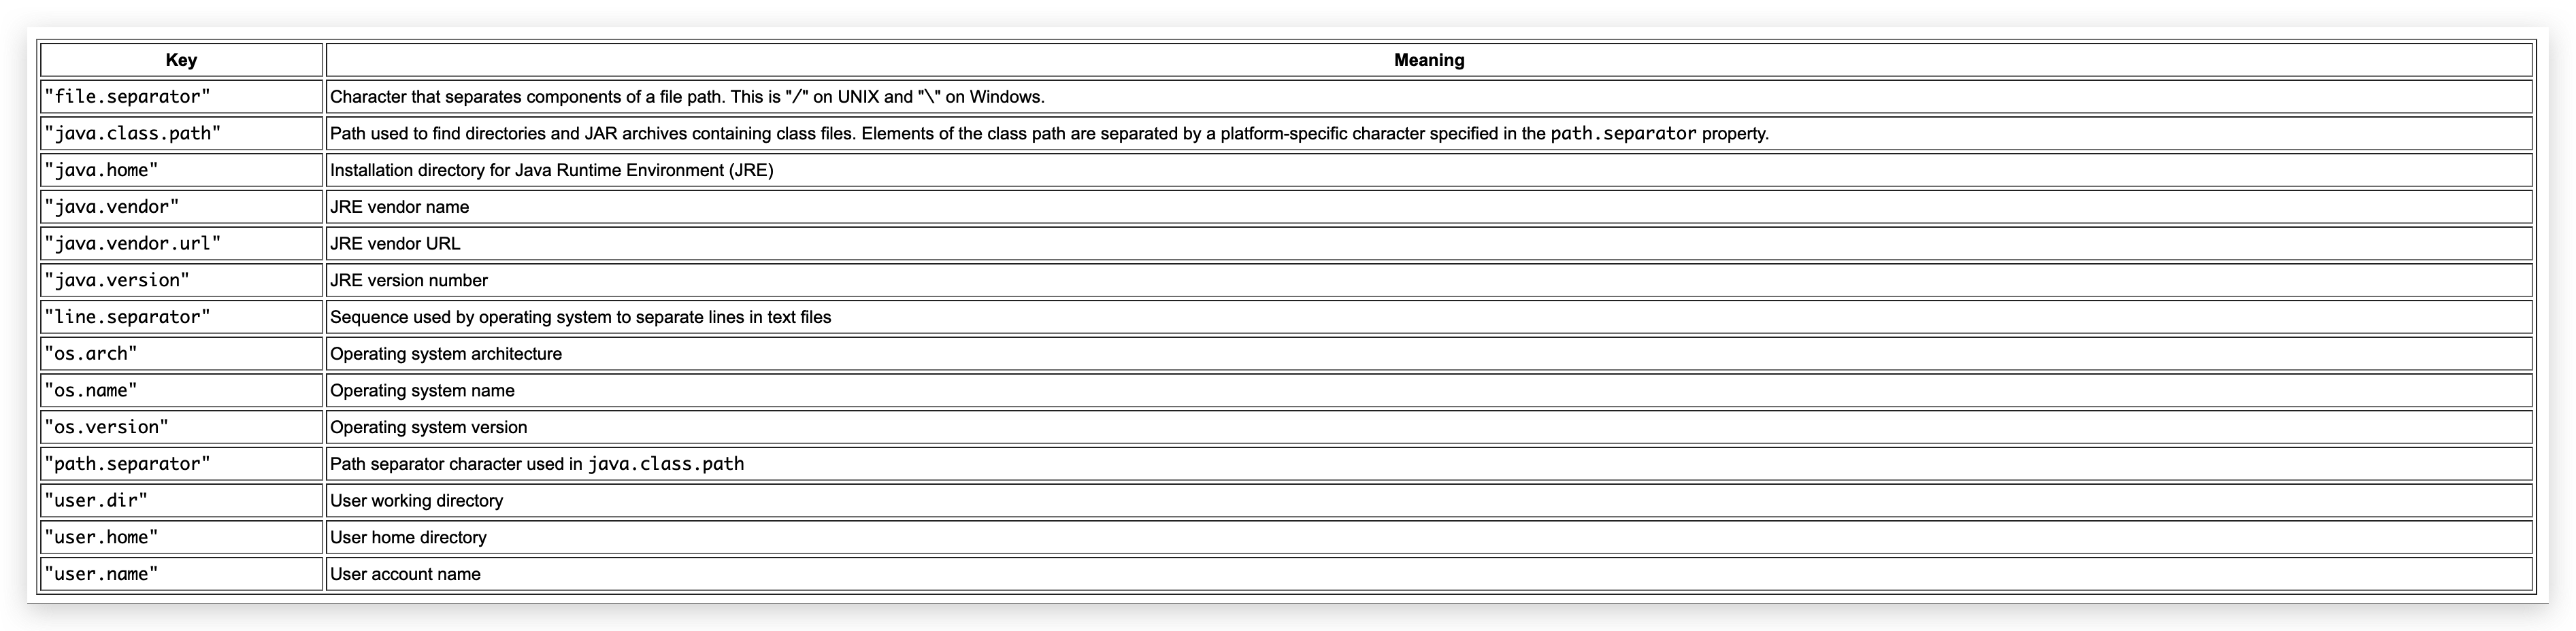
系统属性
来自javadoc
Scanner 类
java.lang.String : 接受用户的键盘输入
导包的一般步骤:
导包:
import 包路径.类名称
如果需要使用的目标类,和当前位于同一个包下,则可以省略导包语句不写。
只有
java.lang包下的内容不需要导包,其他的包都需要import语句。创建:
类名称 对象名 = new 类名称();
使用
对象名.方法名();
Demo:
1 | Scanner sc = new Scanner(System.in); |
匿名对象
创建对象的标准格式:
1 |
|
匿名对象只能使用唯一的一次。
如果确定有一个对象只需要使用唯一的一次,就可以用匿名对象。
1 | int num = new Scanner(System.in).nextInt(); |
Random类
java.util.Random 生成伪随机数。
1 | Random r = new Random(); |
enum枚举类
一般表示一组常量,例如一周有7天、一年有4个季节。
1 | enum Color |
enum内部方法
values(), ordinal() 和 valueOf() 方法
enum 定义的枚举类默认继承了 java.lang.Enum 类,并实现了 java.lang.Seriablizable 和 java.lang.Comparable 两个接口。
values(), ordinal() 和 valueOf() 方法位于 java.lang.Enum 类中:
- values() 返回枚举类中所有的值。
- ordinal()方法可以找到每个枚举常量的索引,就像数组索引一样。
- valueOf()方法返回指定字符串值的枚举常量。
1 | enum Color |
enum枚举类成员
枚举跟普通类一样可以用自己的变量、方法和构造函数,构造函数只能使用 private 访问修饰符,所以外部无法调用。
枚举既可以包含具体方法,也可以包含抽象方法。 如果枚举类具有抽象方法,则枚举类的每个实例都必须实现它。
1 | enum Color |
ArrayList类
java.util.ArrayList
大小可变的集合,长度动态增长
ArrayList
list = new ArrayList<>();
成员方法
public boolean add(E e):将指定的元素添加到集合尾部public E remove(int index):移除指定下标元素,返回被删除的元素。public E get(int index):捕获此集合中指定位置上的元素。public int size():返回此集合中的元素数。遍历集合时,可以控制索引范围,防止越界。
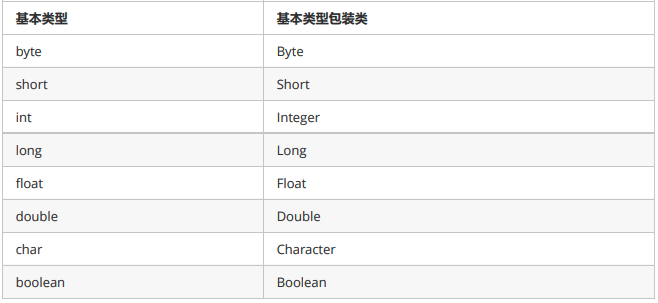
包装类
ArrayList对象不能存储基本类型,只能存储引用类型的数据。
类似<int>不能写,但是存储基本数据类型对应的包装类型是可以的。所以,想要存储基本类型数据,必须转换后才能编写,转换写法如下:
String类
java.lang.String 底层是字符数组
构造方法
public String(char[] value):通过当前参数中的字符数组来构造新的String。public String(byte[] bytes):通过使用平台的默认字符集解码当前参数中的字节数组来构造新的 String。
1 | public class String_Demo01 { |
获取功能的方法
public int length ():返回此字符串的长度。public String concat (String str):将指定的字符串连接到该字符串的末尾。public char charAt (int index):返回指定索引处的 char值。public int indexOf (String str):返回指定子字符串第一次出现在该字符串内的索引。public String substring (int beginIndex):返回一个子字符串,从beginIndex开始截取字符串到字符 串结尾。public String substring (int beginIndex, int endIndex):返回一个子字符串,从beginIndex到 endIndex截取字符串。含beginIndex,不含endIndex。
1 | public class String_Demo02 { |
转换功能的方法
public char[] toCharArray ():将此字符串转换为新的字符数组。public byte[] getBytes ():使用平台的默认字符集将该 String编码转换为新的字节数组。public String replace (CharSequence target, CharSequence replacement):将与target匹配的字符串使用replacement字符串替换。
1 | public class String_Demo03 { |
Arrays 类
java.util.Arrays 此类包含用来操作数组的各种方法,比如排序和搜索等。其所有方法均为静态方法,调用起来 非常简单。
操作数组的方法
public static String toString(int[] a):返回指定数组内容的字符串表示形式。
1 | public static void main(String[] args) { |
public static void sort(int[] a):对指定的 int 型数组按数字升序进行排序。
1 | public static void main(String[] args) { |
StringBuilder 类
StringBuilder是个字符串的缓冲区,即它是一个容器,容器中可以装很多字符串。并且能够对其中的字符串进行各种操作。
它的内部拥有一个数组用来存放字符串内容,进行字符串拼接时,直接在数组中加入新内容。StringBuilder会自动维护数组的扩容,默认16字符空间,超过自动扩充。
1 | public static void main(String[] args) { |
常用方法
StringBuilder常用的方法有2个:
public StringBuilder append(...):添加任意类型数据的字符串形式,并返回当前对象自身。public String toString():将当前StringBuilder对象转换为String对象。
append方法
append方法具有多种重载形式,可以接收任意类型的参数。任何数据作为参数都会将对应的字符串内容添加到StringBuilder中。例如:
1 | public class Demo02StringBuilder { |
toString方法
通过toString方法,StringBuilder对象将会转换为不可变的String对象。如:
1 | public class Demo16StringBuilder { |
集合
集合按照其存储结构可以分为两大类,分别是:
单列集合java.util.Collection
双列集合java.util.Map
Collection集合
单列集合类的根接口,用于存储一系列符合某种规则的元素,它有两个重要的子接口,分别是:
java.util.Listjava.util.Set
其中,List的特点是元素有序、元素可重复。
Set的特点是元素无序,而且不可重复。
List接口的主要实现类有java.util.ArrayList和java.util.LinkedList;
Set接口的主要实现类有java.util.HashSet和java.util.TreeSet。
Collection常用功能
Collection是所有单列集合的父接口,因此在Collection中定义了单列集合(List和Set)通用的一些方法,这些方法可用于操作所有的单列集合。方法如下:
public boolean add(E e): 把给定的对象添加到当前集合中public void clear():清空集合中所有的元素public boolean remove(E e): 把给定的对象在当前集合中删除public boolean contains(E e): 判断当前集合中是否包含给定的对象public boolean isEmpty(): 判断当前集合是否为空public int size(): 返回集合中元素的个数public Object[] toArray(): 把集合中的元素,存储到数组中
List接口
java.util.List 接口继承自 Collection 接口,是单列集合的一个重要分支,习惯性地会将实现了 List 接口的对象称为List集合。
在List集合中允许出现重复的元素,所有的元素是以一种线性方式进行存储的,在程序中可以通过【索引】来访问集合中的指定元素。
另外,List集合还有一个特点就是元素有序,即元素的存入顺序和取出顺序一致。
List常用方法
List作为Collection集合的子接口,不但继承了Collection接口中的全部方法,而且还增加了一些根据元素索引来操作集合的特有方法,如下:
public void add(int index, E element) : 将指定的元素,添加到该集合中的指定位置上。
public E get(int index):返回集合中指定位置的元素。
public E remove(int index): 移除列表中指定位置的元素, 返回的是被移除的元素。
public E set(int index, E element):用指定元素替换集合中指定位置的元素,返回值的更新前的元素。
List集合特有的方法都是跟索引相关:
1 | public class ListDemo { |
Set接口
java.util.Set 接口和 java.util.List 接口一样,同样继承自 Collection 接口,它与 Collection 接口中的方法基本一致,并没有对 Collection 接口进行功能上的扩充,只是比 Collection 接口更加严格了。
与 List 接口不 同的是, Set 接口中元素【无序】,并且都会以某种规则保证存入的元素不出现重复。
Map集合
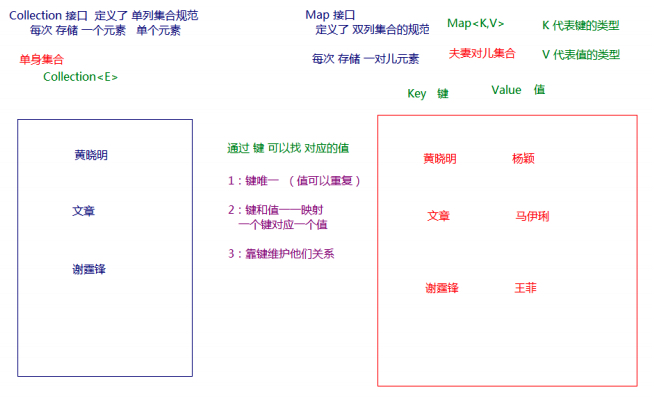
Collection 中的集合,元素是孤立存在的(理解为单身),向集合中存储元素采用一个个元素的方式存储。
Map 中的集合,元素是成对存在的(理解为夫妻)。
每个元素由键与值两部分组成,通过键可以找对所对应的值。
Collection 中的集合称为单列集合, Map 中的集合称为双列集合。
需要注意的是, Map 中的集合不能包含重复的键,值可以重复;每个键只能对应一个值。
Map常用子类
通过查看Map接口描述,看到Map有多个子类,这里我们主要讲解常用的HashMap集合、LinkedHashMap集合。
- HashMap:存储数据采用的哈希表结构,元素的存取顺序不能保证一致。由于要保证键的唯一、不重复,需要重写键的hashCode()方法、equals()方法。
- LinkedHashMap:HashMap下有个子类LinkedHashMap,存储数据采用的哈希表结构+链表结构。通过链表结构可以保证元素的存取顺序一致;通过哈希表结构可以保证的键的唯一、不重复,需要重写键的 hashCode()方法、equals()方法。
tips:Map接口中的集合都有两个泛型变量,在使用时,要为两个泛型变量赋予数据类型。两个泛型变量的数据类型可以相同,也可以不同。
Map接口常用方法
Map接口中定义了很多方法,常用的如下:
public V put(K key, V value): 把指定的键与指定的值添加到Map集合中。
public V remove(Object key): 把指定的键所对应的键值对元素在Map集合中删除,返回被删除元素的值。
public V get(Object key): 根据指定的键,在Map集合中获取对应的value。
public Set<k> keySet(): 获取Map集合中所有的键,存储到Set集合中。
public Set<Map.Entry<K,V>> entrySet() : 获取到Map集合中所有的键值对对象的集合(Set集合)。
演示:
1 | public class MapDemo { |
tips: 使用put方法时,若指定的键(key)在集合中没有,则没有这个键对应的值,返回null,并把指定的键值添加到集合中; 若指定的键(key)在集合中存在,则返回值为集合中键对应的值(该值为替换前的值),并把指定键所对应的值,替换成指定的新值。
Entry 键值对对象
我们已经知道, Map 中存放的是两种对象,一种称为key(键),一种称为value(值),它们在在 Map 中是一一对应关系,这一对对象又称做 Map 中的一个 Entry(项) 。
Entry 将键值对的对应关系封装成了对象。即键值对对象,这样我们在遍历 Map 集合时,就可以从每一个键值对( Entry )对象中获取对应的键与对应的值。
既然Entry表示了一对键和值,那么也同样提供了获取对应键和对应值得方法:
public K getKey():获取Entry对象中的键。
public V getValue():获取Entry对象中的值。
在Map集合中也提供了获取所有Entry对象的方法:
public Set<Map.Entry<K,V>> entrySet() : 获取到Map集合中所有的键值对对象的集合(Set集合)。
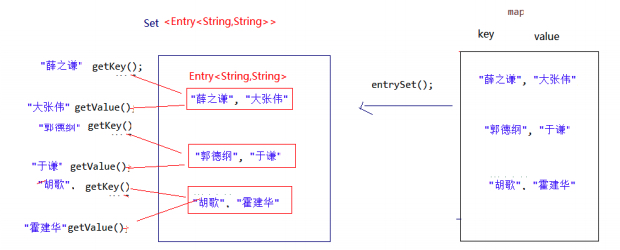
Map集合遍历键值对的方式
键值对方式:即通过集合中每个键值对(Entry)对象,获取键值对(Entry)对象中的键与值。
操作步骤与图解:
- 获取Map集合中,所有的键值对(Entry)对象,以Set集合形式返回。entrySet() 。
- 遍历包含键值对(Entry)对象的Set集合,得到每一个键值对(Entry)对象。
- 通过键值对(Entry)对象,获取Entry对象中的键与值。getKey()/getValue()
1 | public class MapDemo02 { |
图解:
高级用法 函数式编程
介绍几个有趣且强大的API:
1 | // 对key所属的value进行计算 |
代码示例;
1 | public static void ComputeTest(){ |
Iterator迭代器
在程序开发中,经常需要遍历集合中的所有元素。针对这种需求,JDK专门提供了一个接口java.util.Iterator。Iterator接口也是Java集合中的一员,但它与Collection、Map接口有所不同,Collection接口与Map接口主要用于存储元素,而Iterator主要用于迭代访问(即遍历)Collection中的元素,因此Iterator对象也被称为迭代器。
想要遍历Collection集合,那么就要获取该集合迭代器完成迭代操作,下面介绍一下获取迭代器的方法:
public Iterator iterator(): 获取集合对应的迭代器,用来遍历集合中的元素的。
下面介绍一下迭代的概念:
- 迭代:即Collection集合元素的通用获取方式。在取元素之前先要判断集合中有没有元素,如果有,就把这个元素取出来,继续在判断,如果还有就再取出出来。一直把集合中的所有元素全部取出。这种取出方式专业术语称为迭代。
Iterator接口的常用方法如下:
public E next():返回迭代的下一个元素。public boolean hasNext():如果仍有元素可以迭代,则返回 true。
接下来通过案例学习如何使用Iterator迭代集合中元素:
1 | public class IteratorDemo { |
实现原理:
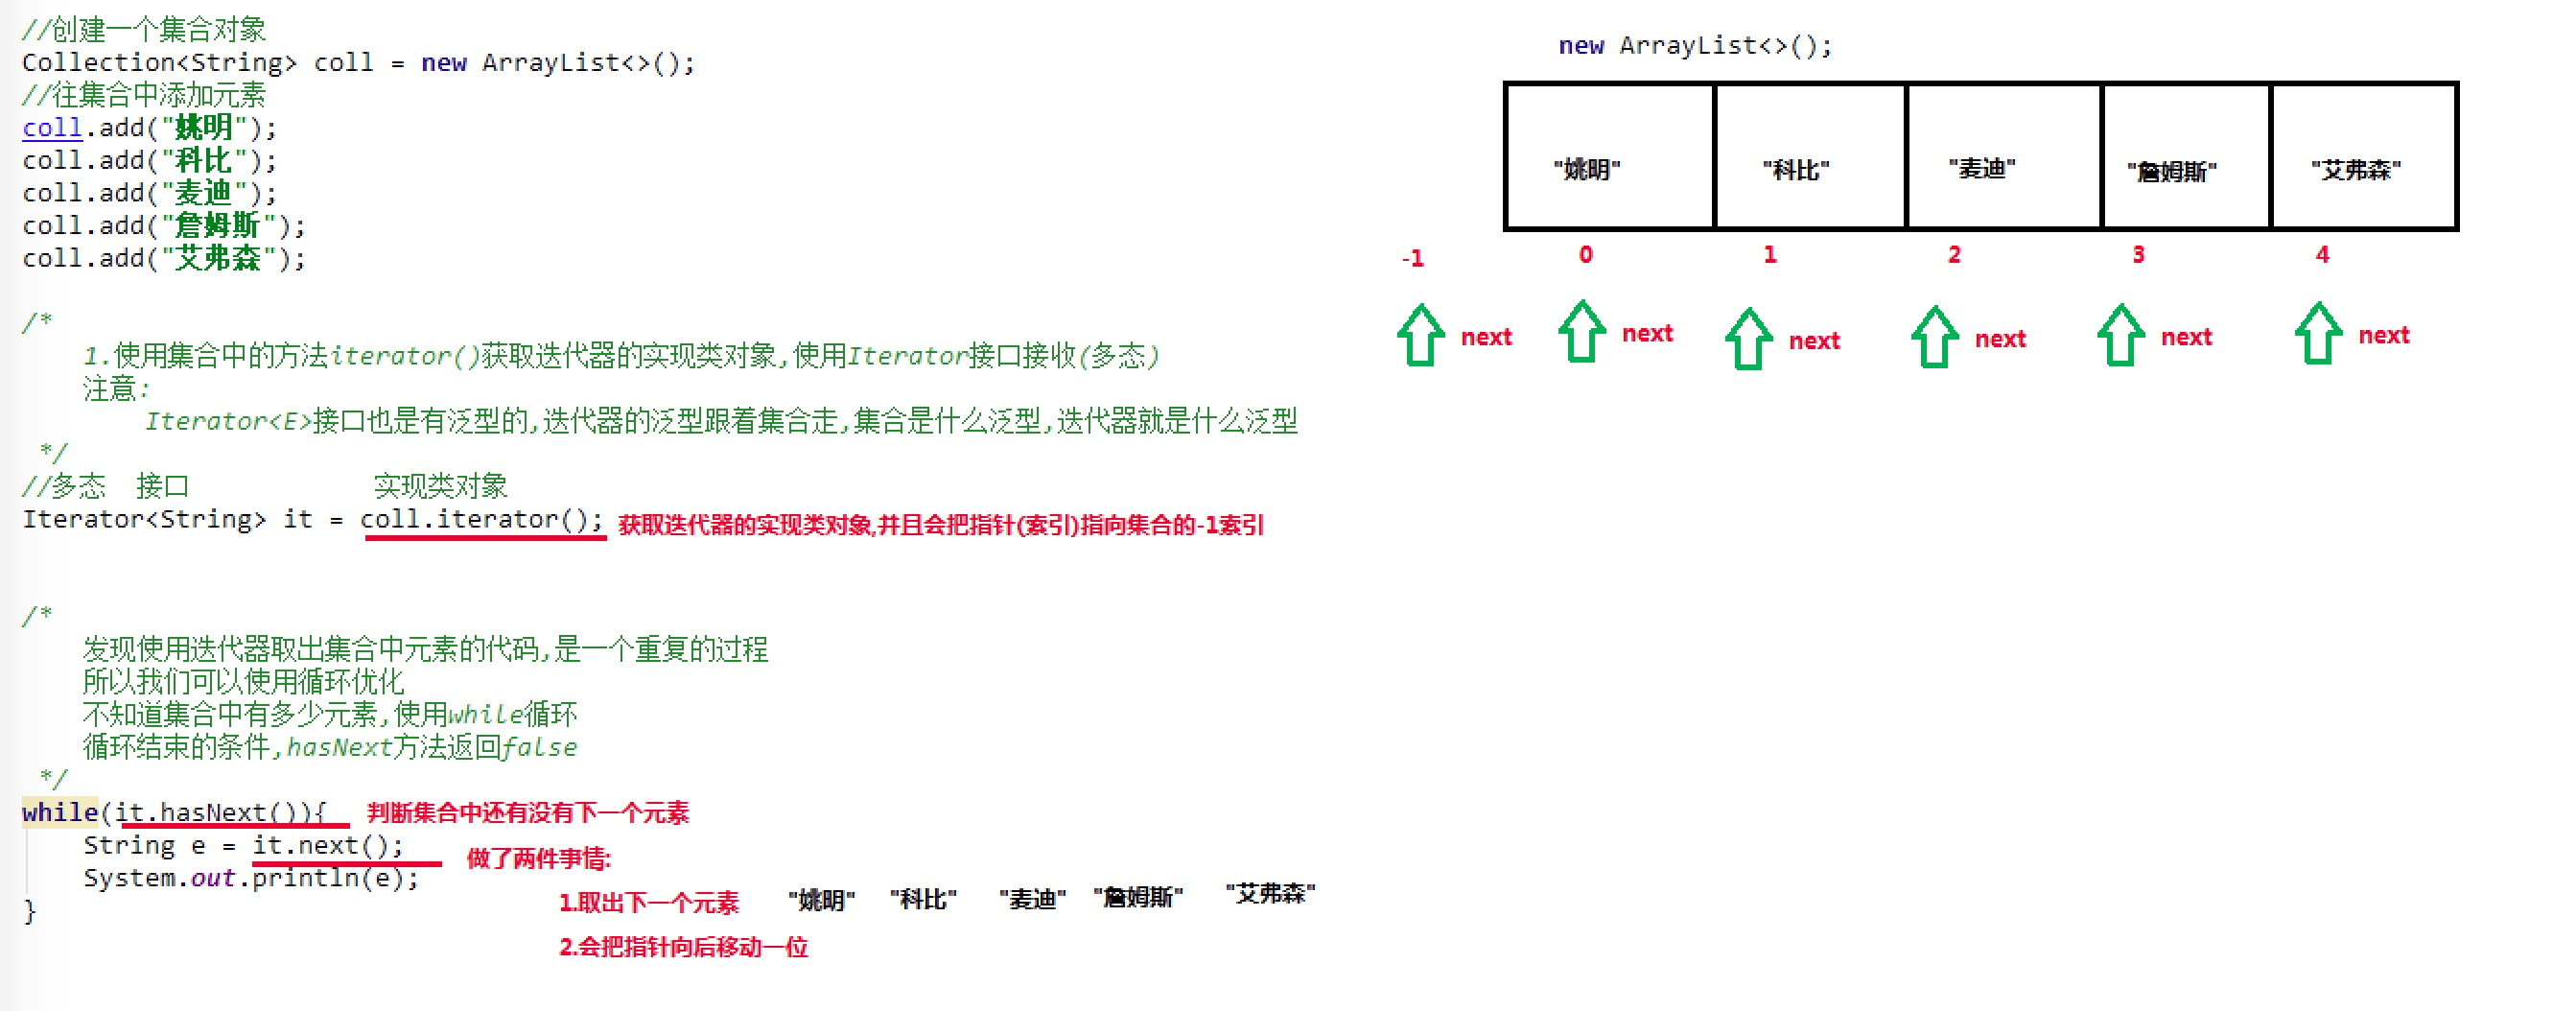
在调用Iterator的next方法之前,迭代器的索引位于第一个元素之前,不指向任何元素,当第一次调用迭代器的next方法后,迭代器的索引会向后移动一位,指向第一个元素并将该元素返回,当再次调用next方法时,迭代器的索引会指向第二个元素并将该元素返回,依此类推,直到hasNext方法返回false,表示到达了集合的末尾,终止对元素的遍历。
增强for
1 | public class NBFor { |
Collection虽然可以存储各种对象,但实际上通常Collection只存储同一类型对象。例如都是存储字符串对象。因此在JDK5之后,新增了泛型(Generic)语法,让人们在设计API时可以指定类或方法支持泛型,这样我们使用API的时候也变得更为简洁,并得到了编译时期的语法检查。
泛型
例如,API中的ArrayList集合:
1 | class ArrayList<E>{ |
使用泛型: 即什么时候确定泛型。
在创建对象的时候确定泛型
例如,ArrayList<String> list = new ArrayList<String>();
此时,变量E的值就是String类型,那么我们的类型就可以理解为:
1 | class ArrayList<String>{ |
此时,变量E的值就是Integer类型,那么我们的类型就可以理解为:
1 | class ArrayList<Integer> { |
举例自定义泛型类
1 | public class MyGenericClass<MVP> { |
使用:
1 | public class GenericClassDemo { |
含有泛型的方法
例如:
1 | public class MyGenericMethod { |
使用格式:调用方法时,确定泛型的类型
1 | public class GenericMethodDemo { |
含有泛型的接口
定义格式:
1 | 修饰符 interface接口名<代表泛型的变量> { } |
例如:
1 | public interface MyGenericInterface<E>{ |
使用格式:
1、定义类时确定泛型的类型
例如
1 | public class MyImp1 implements MyGenericInterface<String> { |
此时,泛型E的值就是String类型。
2、始终不确定泛型的类型,直到创建对象时,确定泛型的类型
例如
1 | public class MyImp2<E> implements MyGenericInterface<E> { |
确定泛型:
1 | /* |
通配符
当使用泛型类或者接口时,传递的数据中,泛型类型不确定,可以通过通配符<?>表示。但是一旦使用泛型的通配符后,只能使用Object类中的共性方法,集合中元素自身方法无法使用。
通配符基本使用
泛型的通配符:不知道使用什么类型来接收的时候,此时可以使用表示未知通配符。
此时只能接受数据,不能往该集合中存储数据。
举个例子大家理解使用即可:
1 | public static void main(String[] args) { |
通配符高级使用—-受限泛型
之前设置泛型的时候,实际上是可以任意设置的,只要是类就可以设置。但是在JAVA的泛型中可以指定一个泛型的上限和下限。
泛型的上限:
- 格式:
类型名称 <? extends 类 > 对象名称 - 意义:
只能接收该类型及其子类
泛型的下限:
- 格式:
类型名称 <? super 类 > 对象名称 - 意义:
只能接收该类型及其父类型
比如:现已知Object类,String 类,Number类,Integer类,其中Number是Integer的父类。
1 | public static void main(String[] args) { |
可变参数
在JDK1.5之后,如果我们定义一个方法需要接受多个参数,并且多个参数类型一致,我们可以对其简化成如下格式:
1 | 修饰符 返回值类型 方法名(参数类型... 形参名){ } |
其实这个书写完全等价与
1 | 修饰符 返回值类型 方法名(参数类型[] 形参名){ } |
只是后面这种定义,在调用时必须传递数组,而前者可以直接传递数据即可。
JDK1.5以后。出现了简化操作。
… 用在参数上,称之为可变参数。
同样是代表数组,但是在调用这个带有可变参数的方法时,不用创建数组(这就是简单之处),直接将数组中的元素,作为实际参数进行传递,其实编译成的class文件,将这些元素先封装到一个数组中,再进行传递。这些动作都在编译.class文件时自动完成的。
1 | public class ChangeArgs { |
File类
java.io.File 类是文件和目录路径名的抽象表示,主要用于文件和目录的创建、查找和删除等操作。
构造方法
public File(String pathname) :通过将给定的路径名字符串转换为抽象路径名来创建新的 File实例。
public File(String parent, String child):从父路径名字符串和子路径名字符串创建新的 File实例。
public File(File parent, String child):从父抽象路径名和子路径名字符串创建新的 File实例。
构造举例,代码如下:
1 | // 文件路径名 |
获取功能的方法
public String getAbsolutePath() :返回此File的绝对路径名字符串。
public String getPath():将此File转换为路径名字符串。
public String getName():返回由此File表示的文件或目录的名称。
public long length() :返回由此File表示的文件的长度。
判断功能的方法
public boolean exists() :此File表示的文件或目录是否实际存在。
public boolean isDirectory() :此File表示的是否为目录。
public boolean isFile() :此File表示的是否为文件。
创建删除的方法
public boolean createNewFile():当且仅当具有该名称的文件尚不存在时,创建一个新的空文件。
public boolean delete() :删除由此File表示的文件或目录。
public boolean mkdir():创建由此File表示的目录。
public boolean mkdirs() :创建由此File表示的目录,包括任何必需但不存在的父目录。
目录遍历的方法
public String[] list() :返回一个String数组,表示该File目录中的所有子文件或目录。
public File[] listFiles() :返回一个File数组,表示该File目录中的所有的子文件或目录。
1 | public class FileFor { |
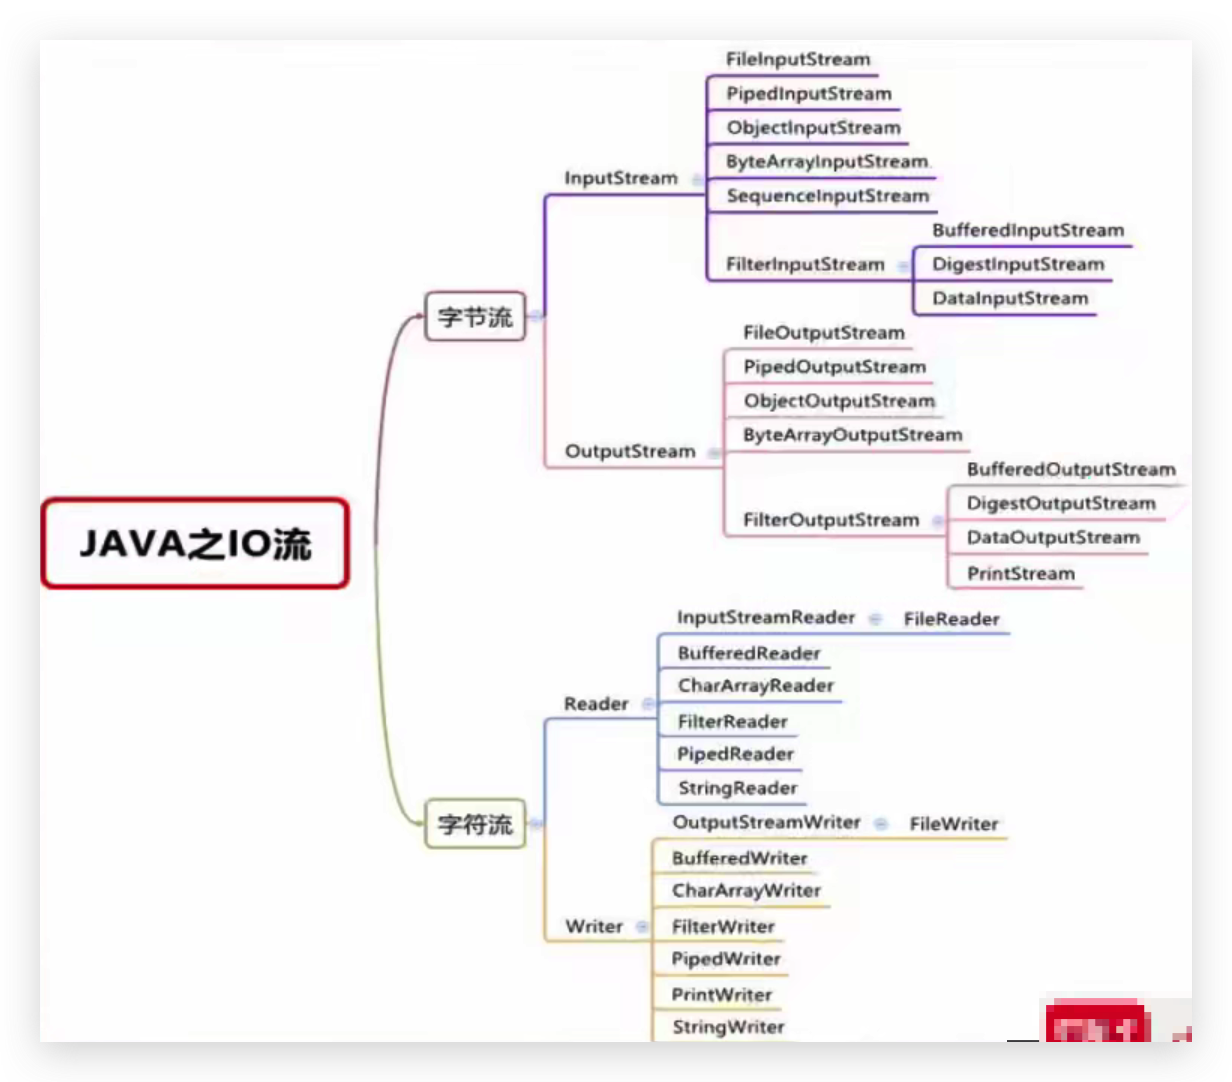
I/O 流
一切视角以内存为主。
文件就是数组的载体,是数据存放的地方。
文件编码是告诉你,字节如何翻译为字符,一个字符对应几个字节
根据数据的流向分为:输入流和输出流。
- 输入流 :把数据从 其他设备 上读取到 内存 中的流。
- 输出流 :把数据从 内存 中写出到 其他设备 上的流。
格局数据的类型分为:字节流和字符流。
- 字节流 :以字节为单位,读写数据的流。
- 字符流 :以字符为单位,读写数据的流。
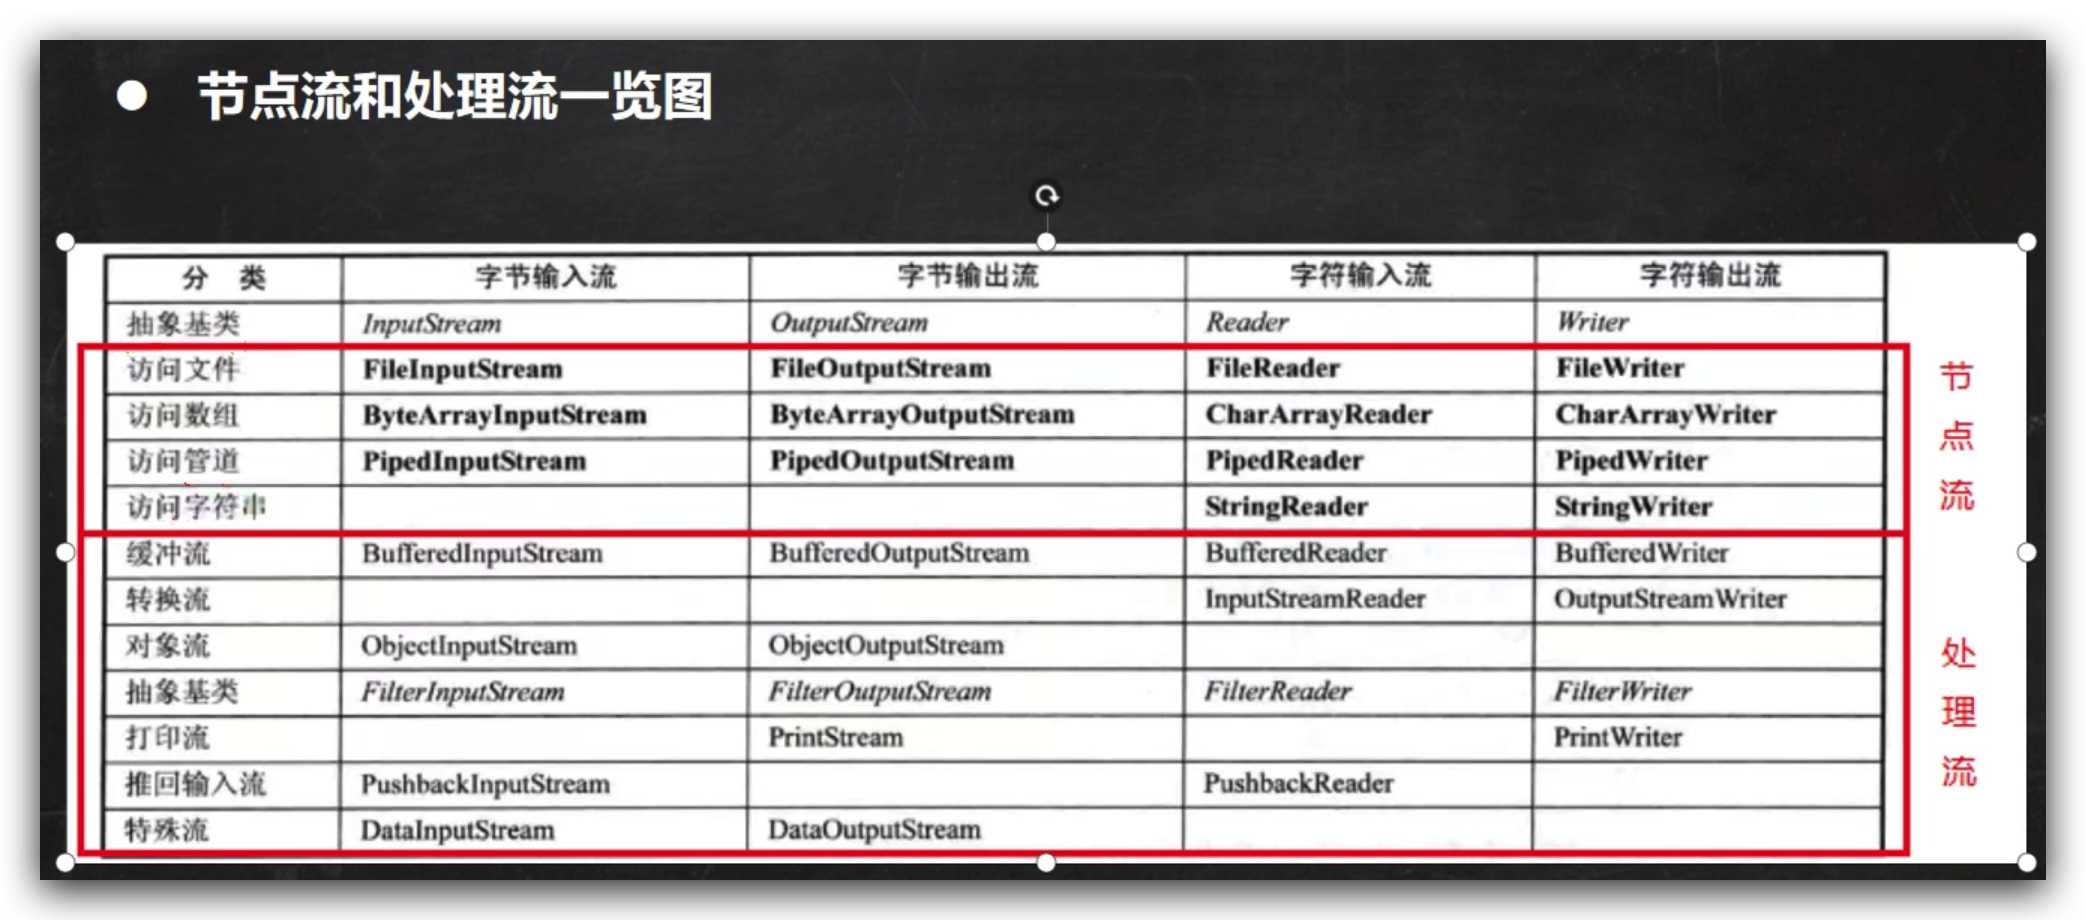
还可以分为:
- 节点流:字节操作数据源的流,数据源:文件、数组、字符串、管道
- 处理流:包装节点流,Buffered开头的流
这是个父类都是抽象类
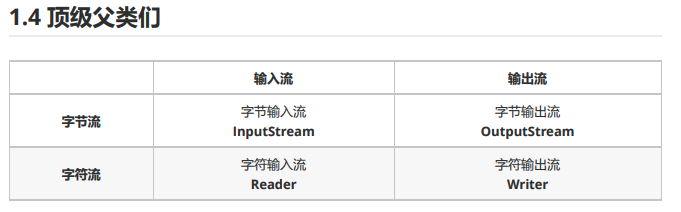
字节流
一切文件数据(文本、图片、视频等)在存储时,都是以二进制数字的形式保存,本质为字节,传输时一样如此。所以,字节流可以传输任意文件数据。在操作流的时候,我们要时刻明确:
无论使用什么样的流对象,底层传输的始终为二进制数据。
字节输出流 OutputStream
java.io.OutputStream 是表示字节输出流的所有类的超类,将指定的字节信息写出到目的地。它定义了字节输出流的基本共性功能方法。
public void close():关闭此输出流并释放与此流相关联的任何系统资源。
public void flush():刷新此输出流并强制任何缓冲的输出字节被写出。
public void write(byte[] b) :将 b.length字节从指定的字节数组写入此输出流。
public void write(byte[] b, int off, int len):从指定的字节数组写入 len字节,从偏移量 off开始输出到此输出流。
public abstract void write(int b):将指定的当个字节输出流。
小贴士: close方法,当完成流的操作时,必须调用此方法,释放系统资源。
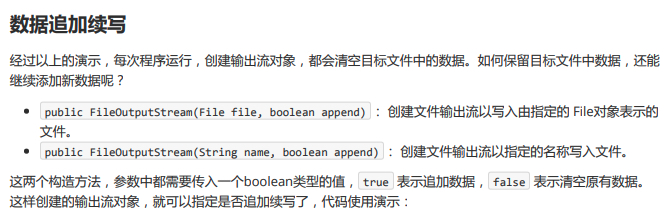
FileOutputStream类
OutputStream 有很多子类,我们从最简单的一个子类开始。
java.io.FileOutputStream 类是文件输出流,用于将数据写出到文件里面。
构造方法:
public FileOutputStream(File file) :创建文件输出流以写入由指定的 File对象表示的文件。
public FileOutputStream(String name): 创建文件输出流以指定的名称写入文件。
当你创建一个流对象时,必须传入一个文件路径。该路径下,如果没有这个文件,会创建该文件。如果有这个文件,会清空这个文件的数据。
Demo:
1 | public class FileOutputStreamConstructor throws IOException { |
写出字节:
write(int b) 方法,每次可以写出一个字节数据,代码使用演示:
1 | public static void main(String[] args) throws IOException { |
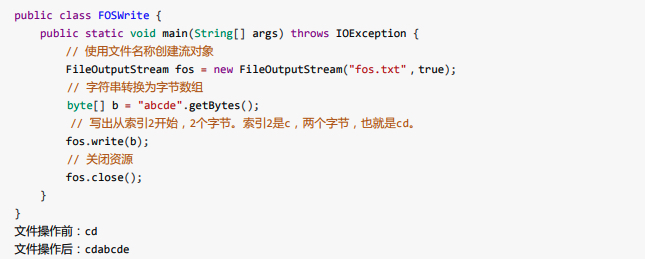
写出字节数组:
write(byte[] b) 每次可以写出数组中的数据,代码使用演示:
1 | public class FOSWrite { |
写出指定长度字节数组:
write(byte[] b, int off, int len),每次写出从off索引开始,len个字节,代码使用演示:
1 | public class FOSWrite { |
字节输入流 InputStream
java.io.InputStream 抽象类是表示字节输入流的所有类的超类,可以读取字节信息到内存中。
常常和循环搭配使用
它定义了字节输入流的基本共性功能方法。
public void close():关闭此输入流并释放与此流相关联的任何系统资源。 public abstract int read() : 从输入流读取数据的下一个字节。
public int read(byte[] b) : 从输入流中读取一些字节数,并将它们存储到字节数组 b中 。
FileInputStream类
java.io.FileInputStream 类是文件输入流,从文件中读取字节。
构造方法:
FileInputStream(File file) : 通过打开与实际文件的连接来创建一个 FileInputStream ,该文件由文件系统中的 File对象 file命名。
FileInputStream(String name) : 通过打开与实际文件的连接来创建一个 FileInputStream ,该文件由文件系统中的路径名 name命名。
1 | public class FileInputStreamConstructor throws IOException{ |
读取字节:
read 方法,【每次】可以读取一个字节的数据,提升为int类型,读取到文件末尾,返回 -1 ,代码使用演示:
循环改进读取方式,代码使用演示:
1 | public class FISRead { |
使用字节数组读取:
read(byte[] b),每次读取b的长度个字节到数组中,返回读取到的有效字节个数,读 取到末尾时,返回 -1 ,代码使用演示:
1 | public class FISRead { |
复制图片文件,代码使用演示:
1 | public class Copy { |
缓冲流(处理流,包装流)
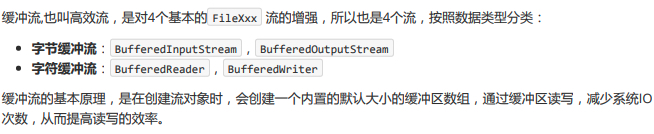
字节缓冲流 BufferedInputStream/OutputStream
构造方法
public BufferedInputStream(InputStream in) :创建缓冲输入流。
public BufferedOutputStream(OutputStream out) : 创建缓冲输出流。
1 | // 创建字节缓冲输入流 |
1 | public class BufferedDemo { |
字符缓冲流 BufferedReader/BufferedWriter
特有方法:
字符缓冲流的基本方法与普通字符流调用方式一致,不再阐述,我们来看它们具备的特有方法。
BufferedReader: public String readLine() : 读一行文字。
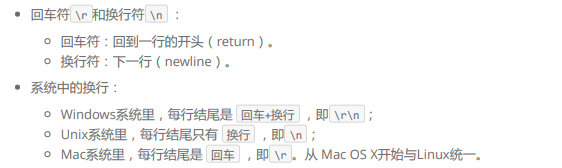
BufferedWriter: public void newLine() : 写入一个“行分隔符”,由系统属性定义符号。
readLine 方法演示,代码如下:
1 | public class BufferedReaderDemo { |
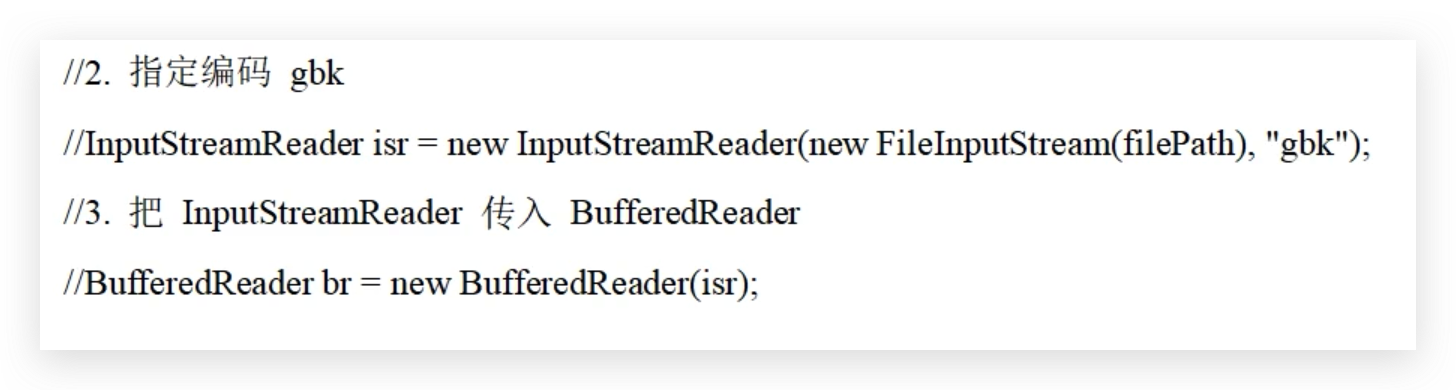
转换流
将字节流按照某种编码方法转换为字符流
将InputStream/OutputStream按照某种编码方式,包装为InputStreamReader/OutputStreamWriter
两种:
- InputStreamReader
- OutputStreamWriter
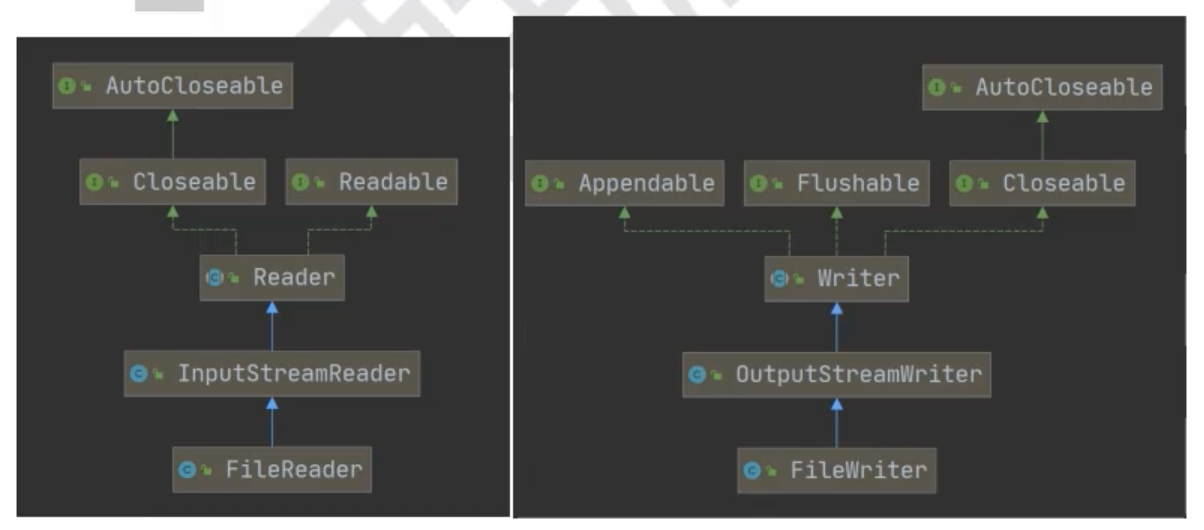
转换流的本质是为了符合特殊的编码要求,转换流的构造方法就能看出来端倪
骚操作
读取类的字节数组
getResource方法
Java为Class对象提供了getResource方法,可以获得该类字节码下的文件路径。
getResource方法接受一个参数,
如果该参数为/,就在classpath的根目录下寻找(不回递归寻找子目录);
如果是具体的文件名,那么就在Class对象所在的目录下来找(不回递归寻找子目录)。
classpath是什么?就是存放class字节码的文件的路径;
maven项目,classpath为“项目名/target/classes”;
普通项目,classpath为”项目名/bin“或者”项目名/build/classes“;
代码片段:
1 | URI uri = Util.class.getResource("Evil.class").toURI(); |